Though it is not recommended, you can create customizations for XMetaL Author and XMetaL for ActiveX using your favorite text editor and Windows Explorer. There are several steps involved in producing a customization; however, your own customization may not require all of the steps listed in this document. Also, although the steps are listed sequentially, you may find that you have to go through several iterations that include one or more of these steps more than once. These steps are listed below only for reference and a rough estimate of the work required to customize XMetaL:
To understand the concepts and principles of customizing XMetaL, this document must be used alongside the XMetaL Customization Guide, to which it will refer, and which can be found at this URL:
http://www.justsystems.com/na/support-user-guides
The section of this document that explains the format of CTM files relies heavily on the sample customization, Journalist; in particular, the Journalist.ctm file. This sample is installed at the same time as XMetaL Author.
Once you have downloaded the XMetaL Customization Guide, you are strongly urged to use the glossary to familiarize yourself with these terms:
You should also thoroughly read the section, "Deploying XMetaL customizations."
It is assumed that before you start the customization of XMetaL, you have a clearly defined project in mind. The customization will be made so that you can achieve goals set out in your project plan. In particular, information you need for creating your DTD or Schema should include:
By understanding your project as broken down into tasks, you can better design your DTD or Schema, and the subsequent XMetaL customization.
The Document Type Definition (DTD) or W3C Schema forms the basis of your customization of XMetaL. After you have planned out the workflow, you should begin the customization by creating (or modifying) your DTD. When you begin your customization of XMetaL, you are faced with one of three scenarios:
Creating or modifying a DTD can be a difficult and time-consuming task. If you are not familiar with the structure of a DTD, it is recommended that you familiarize yourself with it before proceeding. The XMetaL User's Guide contains some XMetaL-specific information on setting up DTDs.
When XMetaL Author is installed, a folder is created: ...\XMetaL\Author\Rules. Your new or newly-modified DTD should reside in this folder once your
customization is complete and tested. This is the first place that XMetaL looks
for DTDs, and in order to create new XML documents based on the DTD (and the
template and rules files you will create later) it is a good idea to put the
completed DTD here.
Note: While you are still developing your customization, it makes more sense to put all your customization files into one folder so that you have easy access to them all.
Once the DTD has been created or modified, you can make the associated
rules file (RLX, RLS, or RLD file). This is not a necessary step, however, as
XMetaL automatically creates a rules files when opening a document based on a
DTD or W3C Schema if the rules file cannot be found. If you do decide to build
a rules file separately, ensure it is located in the ...\XMetal\Author\Rules folder. This is the same folder that contains the DTD for your
customization. The location is not crucial because the System ID can reference
a DTD in any folder; however, the rules file should be in the same location as
the DTD or Schema. For more information on making rules, see the XMetaL
Customization Guide section, "Compiling a rules file with Rules Maker."
Document-level customizations are based on the DTD or Schema. Therefore, a document-level customization of XMetaL cannot begin until you have completed the creation of your DTD or Schema. Once this is accomplished, do the following:
...\XMetaL\Author\Rules folder.If you decided to make a rules file (as described above), copy the compiled rules file instead of the DTD or Schema.
An XMetaL document template has these characteristics:
...\XMetal\Author\Template\templatename sub-folder, where templatename is the name of the template.Here are the typical steps required to create a template:
...\XMetal\Author\Template\templatename, where templatename is the name of the template.XMetaL Author and XMetaL for ActiveX use cascading style sheets to format the document pane in Tags On view and Normal view. These styles define how the document is displayed in other applications (such as browsers) only if those applications support cascading style sheets, and the style sheet is properly linked to the document. XMetaL uses cascading style sheets to format XML and SGML, but SGML files cannot be formatted by current browsers.
You can create your CSS for use in XMetaL using any CSS creation tool (including your favorite text editor) provided the CSS follows the syntax and other specifications. For information on these, see:
Not all properties that are specified in the CSS standard are recognized by XMetaL. For a list of supported CSS properties in XMetaL, see the XMetaL Customization Guide section, "Viewing supported properties."
XMetaL looks for certain special keywords when reading a CSS file that are not part of the CSS specifications. The following proprietary keywords can appear at the top of your CSS file:
$DOCUMENT - Set CSS style rules for the whole document
$MARKSEC - Set CSS style rules for marked sections
$COMMENT - Set CSS style rules for Comment Tags
$PROCINS - Set CSS style rules for Processing Instructions
When you create your CSS file as part of your XMetaL customization, you can include these keywords if you want to take advantage of the functionality in XMetaL that they trigger.
Using $PROCINS as an example: Assume you wanted the processing instruction for replacement text to be hidden and the processing instruction called "my-pi" to be red text on yellow background. You would set the following selectors in the CSS file:
$PROCINS[xm-replace_text]{display: none}
$PROCINS[my-pi]{color: red; background-color: yellow}
The typical steps for using a CSS file in an XMetaL customization are:
...\XMetaL \Author\Display folder.The XMetaL scripting interface provides access to XMetaL via an object model based largely on the Document Object Model (DOM) and the Microsoft Word VBA model.
Note: In XMetaL, the term "Macro" and "Script" are frequently used synonymously.
There are two ways to run scripts in XMetaL:
You can use any scripting language that conforms to the Microsoft Scripting Language Interface. Built-in support is provided for JScript and VBScript. The XMetaL Programmer's Guide provides extensive API documentation and examples for these two languages. Other languages can be used, provided the following criteria are met:
All scripts are contained inside MCR files. The MCR file itself contains XML markup that is read by XMetaL when opening (in the case of application-level customizations), or when loading a document (in the case of document-level customizations).
Individual scripts are denoted inside an MCR file with <MACRO> and </MACRO> element tags. Therefore, inside an MCR file, you can quickly identify
the individual script:
<MACRO><![CDATA[
  . . .
  // Your macro code here
  . . .
]]></MACRO>
All scripts inside the MCR file are surrounded with <MACROS> and </MACROS> element tags:
<MACROS>

  <MACRO><![CDATA[
    . . .
    // Macro one
    . . .
  ]]></MACRO>

  <MACRO><![CDATA[
    . . .
    // Macro two
    . . .
  ]]></MACRO>
</MACROS>
The <MACRO> element has these attributes:
| Attribute | Description |
| name | Macro name (displayed in the Macros dialog) |
| key | Keyboard shortcut key the user can press to launch the macro |
| lang | Text name of the language the macro is written in. Native formats for XMetaL are "JScript" and "VBScript" |
| id | The internal ID of the macro |
| tooltip | The text to display when the cursor is overtop the toolbar button |
| desc | The description of the macro (displayed in the Macros dialog) |
The following is an example of a JScript macro from the Journalist customization sample:
<MACRO name="Insert InlineGraphic" key="" lang="JScript" id="1117"
tooltip="Insert InlineGraphic" desc="Insert an inline graphic"><![CDATA[

function doInsertInlineGraphic() {
  var rng = ActiveDocument.Range;

  // Make Insertion point then try to insert InlineGraphic here
  rng.Collapse(sqCollapseStart);

  // try to insert the graphic
  if (rng.CanInsert("InlineGraphic")) {
    rng.InsertWithTemplate("InlineGraphic");
    rng.Select();
    if (!ChooseImage()) {
      rng.SelectElement();
      rng.Delete();
    }
  }

  else {
    Application.Alert("Cannot insert InlineGraphic here.");
  }
  rng = null;
}
if (CanRunMacros()) {
  doInsertInlineGraphic();
}

]]></MACRO>
When creating application-level customizations, scripts that apply to
all documents must be placed in the macros.mcr file. This file is loaded and read by XMetaL at the time it is
started.
To deploy macro files:
macros.mcr file. This means that if end users have modified their macros.mcr file (either manually or by adding application-level macros to their
version of XMetaL Author) your customization's macros.mcr will overwrite their application-level changes at the time you copy it
into their ...\XMetaL\Author\Macros folder....\XMetaL\Author\Macros folder.For more information about macros and MCR files, see the XMetaL Customization Guide topic, "Macro files in XMetaL Author."
You can control the behavior of XMetaL based on the element that the user is working within by creating and modifying the CTM file that accompanies your customization. This file is an XML document that contains settings for each element in your customization's DTD or Schema.
To greatly simplify the creation of a CTM file, start
XMetaL Author and open a document based on your DTD or Schema. XMetaL Author
creates the CTM file for you! At this point you can modify the values in the
CTM file to suit your customization by copying the file from the ...\XMetaL\Author\Rules folder to your working folder.
Open up your newly-created CTM file and observe its structure. Also open
the ctm.dtd file to observe the elements and their attributes. Each element in this
CTM file corresponds to a property you can set for each element in your DTD or
Schema.
When defining a CTM file for your customization, you must add elements for each customization property you want to take advantage of as well-formed and valid XML.
The next sections list each of the elements allowed in CTM files and shows a "tree view" of the element hierarchy.
The change list is the drop-down list at the left end of the Formatting toolbar. When the insertion point is inside a particular element, the change list contains the names of elements that the current element can be changed to. Choosing an element from the list carries out the change.
Adding Change List entries
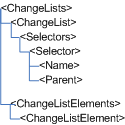
You must create a <ChangeListElement> entry for each element that you want to appear in the Change
List control when a certain parent element is selected in XMetaL.
For example, look at this <ChangeList> entry in the Journalist.ctm file:
  <ChangeLists>

   <ChangeList>
    <Selectors>
      <Selector>
       <Name>#DEFAULT</Name>
       <Parent>Address</Parent>

      </Selector>
    </Selectors>
    <ChangeListElements>
      <ChangeListElement>City</ChangeListElement>
      <ChangeListElement>Country</ChangeListElement>

      <ChangeListElement>Email</ChangeListElement>
      <ChangeListElement>Fax</ChangeListElement>
      <ChangeListElement>Phone</ChangeListElement>
      <ChangeListElement>POB</ChangeListElement>

      <ChangeListElement>Postcode</ChangeListElement>
      <ChangeListElement>State</ChangeListElement>
      <ChangeListElement>Street</ChangeListElement>
    </ChangeListElements>

   </ChangeList>
  </ChangeLists>
If the user's cursor is inside an <Address> element (in the Journalist DTD), the Change List shows the <City>, <Country>, <Email>, <Fax>, <Phone>, <POB>, <Postcode>, <State>, and <Street> elements, and the user can select any of these elements from the
Change List.
Notes:
<Name> always use #DEFAULT.You can configure XMetaL to treat selected elements in the current DTD as paragraphs. The rank that XMetaL uses is controlled by the order they are added to the CTM file, with the first element having the highest rank, the second having the second-highest, etc.

Indicating which elements are to be treated as paragraphs
When the CTM file is loaded, the <Paragraphs> element is parsed and the internal treat As properties are set
according to the elements declared in the <Name> entry.
For example, look at the Journalist.ctm file's <Paragraphs> element:
  <Paragraphs>

   <Paragraph>
    <Name>Para</Name>
   </Paragraph>

   <Paragraph>
    <Name>BiblioEntry</Name>

   </Paragraph>

  </Paragraphs>
In this example, there are only two elements in the Journalist DTD that
are treated as paragraph elements: <Para> and <BilblioEntry>. The element names, as declared in the Journalist DTD, are indicated
inside the <Name> element tags, which are nested inside their respective <Paragraph> element tags.
Each element to be treated as a paragraph must be declared in its own
unique <Paragraph> --> <Name> structure (i.e., each <Paragraph> element must contain only one <Name> element, and each <Name> element must contain only one element name from your DTD).
Note: The <Parent> element is optional.
When a user (or a script) in XMetaL inserts an element into a document,
you may want to create some "boilerplate" text, processing instructions, or a
series of elements. You can create this functionality with the <Templates> element.

Creating OnInsert content with the <Templates> element
You can think of Templates as a limited way to handle the
OnInsert event. When an element is inserted into the XML document based
on your DTD, the <Templates> element indicates what content is to be created.
Look at the following sample from the Journalist CTM:
  <Templates>

   <Template>
    <Name>Abstract</Name>
    <MiniTemplate><![CDATA[<Abstract><Para><?xm-replace_text Type Abstract here.?></Para></Abstract>]]></MiniTemplate>

   </Template>

   <Template>
    <Name>Appendix</Name>
    <MiniTemplate><![CDATA[<Appendix><Title><?xm-replace_text Title?></Title><Para><?xm-replace_text Type Appendix here.?></Para></Appendix>]]></MiniTemplate>

   </Template>

   <Template>
    <Name>Article</Name>
    <MiniTemplate><![CDATA[<Article><Title><?xm-replace_text Article Title?></Title><Para><?xm-replace_text Paragraph?></Para></Article>]]></MiniTemplate>

   </Template>

   <Template>
    <Name>CAPTION</Name>
    <MiniTemplate><![CDATA[<CAPTION><?xm-replace_text Caption?></CAPTION>]]></MiniTemplate>

   </Template>

   ...

  </Templates>
For each new OnInsert action you want to perform, you must create
a new <Template> child element of the <Templates> element. Indicate which element from your DTD is to have
OnInsert content created, and surround your new content with the <MiniTemplate> element.
Notes:
<MiniTemplate> element) with the strings "<![CDATA[" and "]]>".<Parent> element is optional.<MiniTemplate> elements, you must ensure that your DTD allows for the creation of the
markup you indicate. Otherwise, XMetaL ignores the attempt to create invalid
markup.You can configure XMetaL to create an element of your choice when the user presses [Enter] at the end of a particular element.
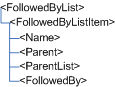
Indicating the FollowedBy element
Use the <Name> element to indicate the element from your DTD that XMetaL is to insert
an element for. Indicate what following element is to be inserted by putting
the name of the element from your DTD in the <FollowedBy> element.
For example, look at the sample of the <FollowedBy> element entries in the Journalist CTM:
  <FollowedByList>

   <FollowedByListItem>
    <Name>ItemizedList</Name>
    <FollowedBy>Para</FollowedBy>
   </FollowedByListItem>

   <FollowedByListItem>
    <Name>Sect1</Name>
    <FollowedBy>Sect1</FollowedBy>
   </FollowedByListItem>

   <FollowedByListItem>
    <Name>Sect2</Name>
    <FollowedBy>Sect2</FollowedBy>
   </FollowedByListItem>

   <FollowedByListItem>
    <Name>Sect3</Name>
    <FollowedBy>Sect3</FollowedBy>
   </FollowedByListItem>

   ...

  </FollowedByList>
In the first <FollowedByListItem> element, the <ItemizedList> element (from the Journalist DTD) is indicated as having a
FollowedBy element defined to be <Para>. This means that when the user is at the end of an <ItemizedList> element in a Journalist document, and presses [Enter], a <Para> element is created.
In the second <FollowedByListItem> element, the <Sect1> element (from the Journalist DTD) is indicated as having a
FollowedBy element defined to be another <Sect1> element. This means that when the user is at the end of a <Sect1> in a Journalist document, and presses [Enter], another <Sect1> element is created.
Notes:
<Parent> and <ParentList> are mutually exclusive (you can only indicate one or the other) and
either is optional.<FollowedBy> element, you must ensure that your DTD allows for the creation of the
element you indicate. Otherwise, XMetaL ignores the attempt to create invalid
markup.You can specify a script to be loaded and run whenever a particular element from the current DTD is inserted.
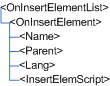
Specifying a script to be loaded and run whenever a particular element from the current DTD is inserted.
You must first indicate which element is to have a script inserted in
the <OnInsertElement> element. You must then indicate the scripting language and the content
of the script to run in the <Lang> and <InsertElemScript> elements respectively.
For example, look at two script insertions from the Journalist CTM:
  <OnInsertElementList>

   <OnInsertElement>
    <Name>BiblioItem</Name>
    <Lang>JScript</Lang>
    <InsertElemScript><![CDATA[// Add unique "Id" attribute to BiblioItem
var Id = ActiveDocument.UniqueAttributeValue("Id", "Bib", 1);
var str = '<BiblioItem Id="' + Id + '">';
str += '<Designator><?xm-replace_text Designator?></Designator>';
str += '<BiblioEntry><?xm-replace_text Bibliography Entry?></BiblioEntry>';
str += '</BiblioItem>';
Selection.TypeText(str);
Selection.MoveToElement("Designator", false);
]]></InsertElemScript>

   </OnInsertElement>

   <OnInsertElement>
    <Name>Annotation</Name>
    <Lang>JScript</Lang>

    <InsertElemScript><![CDATA[Application.Run("Insert Annotation");]]></InsertElemScript>
    </OnInsertElement>

    ...

  </OnInsertElementList>
In the first example above, a JScript is defined for the <BiblioItem> element from the Journalist DTD. The script creates an "Id" attribute
and two more elements, then sets focus on the <Designator> element. To the user, the appearance is that when a <BiblioItem> element is inserted, two more elements are also inserted, and the focus
is set to the first inserted element.
In the second example, a JScript is defined for when an <Annotation> element is inserted into the document. The macro script Insert
Annotation is run at the time the <Annotation> element is inserted.
More about inserting scripts
Most scripts are written in JScript or VBScript, but you can use any language for which you have a scripting engine that conforms to the Microsoft Scripting Engine interface. The name of the language must correspond to the ProgId (for example, PerlScript or Python) of the ActiveX control that implements the script engine.
The XMetaL scripting interface is based on a set of scripting extensions that implement the Document Object Model (DOM). For more information, see the XMetaL Programmer's Guide, which can be found as an online help file at this URL:
http://www.justsystems.com/na/support-user-guides
Notes:
The definition of the element properties using the <ElementPropertiesList> may form the largest part of your customized CTM file. Properties
affecting appearance and behavior for each element as well as
globally are set up using this element. Look at the tree view of this
element and its child elements:
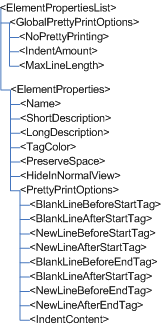
There are two parts to this element, global-level properties and element-level properties.
Global pretty Printing options
The <GlobalprettyPrintOptions> element is optional, but if it is included, it applies to all elements
displayed in the XMetaL Source View only.
The element <NoprettyPrinting> normally does not exist in a CTM file, and is only included if you want
to turn pretty Printing off.
The default value for <IndentAmount> is 2, which means that child elements are displayed in Source
View with two more preceding spaces than their parent elements are displayed
with.
The default value for <MaxLineLength> is 80 characters, though other settings may affect the number of
characters in length a line breaks at (see pretty Printing properties
below).
Element properties
You can set up a series of properties for each element in your DTD,
including pretty Printing properties. Indicate which element in your DTD you
want to set the properties for with the <Name> element.
If you want, you can create a <ShortDescription> and a <LongDescription>, as well as indicate the <TagColor>, which is a string indicating the color (e.g., "red") that the
element's tag is displayed as in XMetaL.
The default for <preserveSpace> is false, which means that if you want to preserve whitespace in
the contents of an element, you must include this element.
The default for <HideInNormalView> is false, which means that if you want to hide an element (such
as an internal index, or content the user should not change) you must include
this element.
All child elements of <prettyPrintOptions> default to false. If you want any of these properties to be
true for the element you are setting up, you must include them in this
definition. Please note that these properties apply to elements displayed in
Normal and Tags On views only.
Take a look at the property settings for the <BiblioItem> element in the Journalist CTM:
  <ElementProperties>

   <Name>BiblioItem</Name>
   <ShortDescription>Bibliography Item</ShortDescription>
   <LongDescription>Bibliography item</LongDescription>
   <prettyPrintOptions>

    <NewLineBeforeEndTag/>
    <NewLineBeforeStartTag/>
    <IndentContent/>
   </prettyPrintOptions>
  </ElementProperties>
Both a long and short description are defined, and three pretty Printing
properties are set (which means they are true, and all other pretty
Printing options are false). Because the <IndentAmount> was not included, the value remains as the default of 2, and
because the <MaxLineLength> was not included, the value remains as the default of 80. <preserveSpace> and <HideInNormalView> were not included, which means that both properties remain as their
default values of false.
When the CTM file is loaded, the <ListElements> element is parsed and the internal treat As properties are set
according to the elements declared in the <Name> entry.
Setting up lists
XMetaL displays list elements according to their type, as defined in the
<ListElements> element:
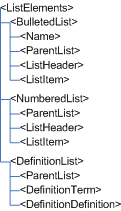
Look at the lists defined in the Journalist CTM:
 <ListElements>

  <BulletedList>
   <Name>ItemizedList</Name>

   <ListItem>ListItem</ListItem>

  </BulletedList>

  <NumberedList>
   <Name>OrderedList</Name>

   <ListItem>ListItem</ListItem>

  </NumberedList>

  <DefinitionList>
   <Name>VarListEntry</Name>

   <DefinitionTerm>Term</DefinitionTerm>
   <DefinitionDefinition>ListItem</DefinitionDefinition>

  </DefinitionList>

 </ListElements>
In the Journalist DTD, the <ItemizedList> element is defined as a bulleted list, and the element <ListItem> is defined for items in the bulleted list. Similarly, the <OrderedList> element from the Journalist DTD is defined as a numbered list, and the
element <ListItem> is defined for items in the numbered list. Note that the same element (<ListItem>) can be used for both these lists as well as for items in a definition
list.
Note: It is important to remember that these elements are defined structurally only. The appearance of bulleted, numbered, and definition lists must still be set up in the CSS file.
When the CTM file is loaded, the <Images> element is parsed and the internal treat As properties are set
according to the elements declared in the <Name> entry.

Setting up elements to be treated as images
Nested inside the <Images> element there can be any number of <Image> elements. For each <Image> element, you must include the element name from your DTD, as well as
the image's attribute information:
Take a look at the <Images> element in the Journalist CTM:
  <Images>

   <Image>
    <Name>Graphic</Name>
    <Source-Attribute>FileRef</Source-Attribute>
    <Height-Attribute>Depth</Height-Attribute>

    <Width-Attribute>Width</Width-Attribute>
    <AltText-Attribute>Alt</AltText-Attribute>
   </Image>

   <Image>

    <Name>InlineGraphic</Name>
    <Source-Attribute>FileRef</Source-Attribute>
    <Height-Attribute>Depth</Height-Attribute>
    <Width-Attribute>Width</Width-Attribute>

    <AltText-Attribute>Alt</AltText-Attribute>
   </Image>

  </Images>
In the Journalist DTD there are two elements indicated as images: <Graphic> and <InlineGraphic>. They are defined as such by their inclusion in their separate <Image> child elements of the <Images> element.
Notes:
<ParentList> element is optional<Source-Attribute> is required.You can associate elements in your DTD with a wide variety of in-place
ActiveX controls to determine the appearance and function of the element's
contents in documents based on your DTD. This is controlled in XMetaL with the <OCXReplacements> element in the CTM file.
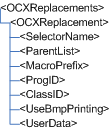
To indicate the use of an ActiveX control "override" for an element
Indicate the element that you want to supplant with an ActiveX control
by putting its name in the <SelectorName> element.
The <Macroprefix> element is a (prefix) string that you can later use in script so that
the control can communicate with XMetaL.
The two elements <ProgID> and <ClsID> are mutually exclusive, and indicate the identifier for the control you
want to use.
The optional element <UseBmpPrinting> is false by default, so its inclusing turns bitmap printing on, and its
exclusion keeps bitmap printing off. Bitmap printing uses a special printing
mechanism when using in-place controls. This option has been provided because
some controls (for example, the Internet Explorer WebBrowser Control) do not
print using the standard ActiveX mechanism. If one of your controls does not
print using the default mechanism, you should include this element.
The optional element <UserData> is a string that any other script or macro can access. It is the
equivalent to the argument passed when adding an InPlaceControl object
in script.
Take a look at this example for handling the display of graphics in the Journalist CTM:
  <OCXReplacements>

   <OCXReplacement>
    <SelectorName>Graphic</SelectorName>
    <Macroprefix>Graphic</Macroprefix>
    <ProgID>Shell.Explorer</ProgID>

   </OCXReplacement>
  </OCXReplacements>
In this example, the <Graphic> selector from Journalist is defined (in the <SelectorName> element) as having an ActiveX control "override" of Windows Explorer
(determined by <ProgID>).
In XMetaL there are three buttons that are always present in the
interface: Bold, Italic, and Underline. When an element is
assigned to one of these buttons, clicking the button inserts an empty inline
element in the active document at the cursor location or surrounds selected
text with the inline element markup (if the assigned element is valid in that
location). You can also click the button to remove markup for the assigned
element from the selected text. These three buttons are set up in the <TogglingInlines> element of the CTM file.
When the CTM file is loaded, the <TogglingInlines> element is parsed and the internal treat As properties are set
according to the elements declared in the <Bold>, <Italic>, and <Underline> entries. In addition, the <Name> entry can further define other elements from your DTD as "toggling"
elements.
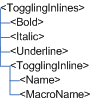
Defining toggling inline elements
The three "native" toggling inline elements can be mapped to elements
from your DTD by including the names of the elements from your DTD inside their
respective toggling elements. So, for example, to indicate that an element in
your DTD is to be a Bold element, make that element name the content of
the <Bold> element in the CTM file. Use the same method for the Italic and
Underline toggling elements.
Take a look at this example from the Journalist CTM:
  <TogglingInlines>

   <Underline>
    <Name>Underscore</Name>
   </Underline>

   <Bold>
    <Name>Strong</Name>

   </Bold>

   <Italic>
    <Name>Emphasis</Name>
   </Italic>

  </TogglingInlines>
In the Journalist.ctm file, the <Underscore> element is defined as the Underline toggling element, the <Strong> element is defined as the Bold toggling element, and the <Emphasis> element is defined as the Italic toggling element.
Assigning a macro to an element
Using the <TogglingInlines> element, you can assign a specific macro to an element in your DTD.
To indicate which element to assign the macro to, use the <Name> element. To indicate which macro to assign to it, use the <MacroName> element.
Notes:
<MacroName> element is the exact name of a macro.You can customize your documents and templates by creating embedded
forms or dialog boxes associated with specific elements to facilitate ease of
correct data entry and XML markup. Forms are created using the XFT Form Layout
Editor, which is a standalone executable. (To open the XFT Form Layout Editor:
Browse to the \Program Files\Blast Radius\XMetaL x.x\Developer\bin folder and launch the XFLayout.exe program.)

Linking your own XFT form
To link an XFT form to an element in your DTD, enter these values for
the <XFtreplacements> element:
For <SelectorName>, indicate the element from your DTD that the XFT form is linked to.
The <ParentList> element is optional.
The <FormFileName> is the relative path to the XFT form. When entering this path, surround
the text with the strings, "<![CDATA[" and "]]>".
The <RunMode> can be only one of two vaules: Embedded or Modal:
For <DisplayStyle>, indicate one of three values: Replace, Before, or
After. This value indicates the form's location relative to the content.
In most cases, you will want to indicate Replace; however, there may be
times when you want to preserve content that is related to the data entered on
the form. In these cases, indicate Before or After. Before
and After values only apply to attributes (not elements).
The <OverrideRule> element indicates when XMetaL is to display the form. This can have the
value only of either Always or Dynamic. If you indicate
Always, the form is displayed automatically and at all times the <SelectorName> element has focus.
If you indicate Dynamic, you must create a script for XMetaL to
call before it displays the form. Use this dynamic script to create business
rules that determine whether or not to display the form at run-time. The script
must be put into the <OverrideScript> described below.
For the <Lang> element, indicate the XFT form's langugae (usually JScript or
VBScript). This language is set when creating the form in the Form Layout
Editor.
The <OverrideScript> is only necessary if you have indicated that there is to be a Dynamic
Script in the <OverrideRule> element (above).
For example, the following JScript shows how a dynamic display script can be used to conditionally display a form, depending on what the immediate parent of the form's node is:
<OverrideScript><![CDATA[// Get the form control
// Its node member is the DOMNode of the element to be tested
var aipc = Application.ActiveInPlaceControl;
// If the node's parent is "Publisher" ...
if (aipc.Node.parentNode.nodeName = "Publisher") {
// ... then display the form
aipc.ShouldCreate = true;
}
else {
// ... otherwise do not display the form
aipc.ShouldCreate = false;
}]]></OverrideScript>
Take a look at this example from the Journalist DTD:
  <XFtreplacements>

    <XFtreplacement>
      <SelectorName>Author</SelectorName>
      <FormFileName><![CDATA[..\Forms\Author.xft]]></FormFileName>
      <RunMode>Embedded</RunMode>

      <DisplayStyle>Replace</DisplayStyle>
      <OverrideRule>Always</OverrideRule>
      <Lang>JScript</Lang>
    </XFtreplacement>

    ...

  </XFtreplacements>
In this example, a dynamic display script is used to conditionally display a form, depending on what the immediate parent of the form's node is:
Use this property to tag any element according to its parent, provided
the DTD or Schema hierarchy allows for it. If an element is a member of the <ParentList> for the indicated <Parent> entry, the element is treated as unique from that same element with a
different parent.(or with no parent).
In many other CTM properties, the <Parent> element is optional. If you set up the <Parent> --> <ParentList> here, and you include the <Parent> element in the other CTM properties, XMetaL only applies those other
properties if the element is a member of the <ParentList>.
For example, consider the following two structures:
<ParentOne>

 <ChildElement/>
</ParentOne>

<ParentTwo>
 <ChildElement/>
</ParentTwo>
Note that <ChildElement> is a child of both <ParentOne> and <ParentTwo>. Let's assign another CTM property, Template (which we've
already looked at):
<Template>

 <Name>ChildElement</Name>
 <Parent>ParentOne</Parent>
 <MiniTemplate><![CDATA[<?xm-replace_text Type here.?>]]></MiniTemplate>

</Template>
Because the <Parent> element was included, and the parent was set as the <ParentOne> element (from our example above), the replacement text is only inserted
if the <ChildElement> element has the <ParentOne> parent element.
In the CTM file, you can change properties for the #GLOBAL element that affect all other elements.
You can set unique customization properties to similarly-named elements
from different Schemas. Namespaces are formatted in the form: {namespace}:{elementname}
To deploy CTM files:
ctm.ctm file. This means that if end users have modified their ctm.ctm file your customization's ctm.ctm will overwrite their application-level changes at the time you copy it
into their ...\XMetaL\Author\Rules folder....\XMetaL\Author\Rules folder.For more information about CTM files and the element properties defined inside them, see the XMetaL Customization Guide topics, "The customization file editor" and "Deploying XMetaL customizations." See also the XMetaL Programmer's Guide section "The Customizations Interface."
Customized toolbar and menu settings are stored in the toolbar TBR file. You can open and look at the settings, but you are strongly urged not to modify it directly. Instead, use XMetaL Author's built-in toolbar modification functionality, and later deploy the TBR file to end users' machines.
For information on how to customize toolbars, see the XMetaL Author online help topics, "To create a custom toolbar" and "To add a button to a toolbar" and also see the XMetaL Customization Guide section, "Working with toolbars."
To deploy TBR files:
...\XMetaL \Author\Rules folder.Many user interface settings are controlled at XMetaL start-up by
variables set in the xmetalx.ini file (where x is the version number of XMetaL).
XMetaL Author has a minimum of two xmetalx.ini configuration files. There is one global xmetalx.ini file, and one xmetalx.ini for every user; therefore, for a one-user setup there are two xmetalx.ini files, for a two-user setup there are three xmetalx.ini files, etc.
For more information about the settings in the INI file(s), see the XMetaL Customization Guide chapter, "The xmetalx.ini file."
Once you have made changes to your customization files, you can open a document based on your DTD in XMetaL (for document-level customizations) or open any document in XMetaL (for application-level customizations) and observe your customization changes.
For debugging your customizations, you can configure XMetaL Author and ActiveX to instantly recognize changes to, reload, and redisplay the following files on the fly:
To enable this functionality, create the following DWORD value in your Windows Registry:
[HKEY_LOCAL_MACHINE\SOFTWARE\SoftQuad\XMetaL x.x]
"DevelopmentVersion"=dword:00000001
(Where x.x is the version number of XMetaL.)
The XMetaL Customization Guide section, "Debugging customizations" contains some information that, although directly related to the integrated development environment, may prove useful to you when debugging your customizations "manually."